Hello World Tutorial (IQ)
If you haven’t yet please read the IQ Introduction before going through with this tutorial.
Insomnia is one way to test out and work with the API, This Tutorial will walk through downloading and setting up Insomnia. This Tutorial covers the same steps as the other two “Hello World” Tutorials which use cURL commands or Postman.
Starting
BurstIQ Administrators must create a new client data-space before any interactions can begin. Once that and a username/password credential has been created with an ADMIN role it is possible to start the tutorial. Remember that a “client” name identifies a unique data-space within the Secure Data Grid that segments that client’s data from others.
The below steps are all done using Insomnia, the main differences between the commands below are the URL, the Authorization, the Request Body, and the Request Type.
Initial Setup
First you will need to Download and Install the Insomnia App from their website.
The download can be found here: Insomnia Download
Once it is installed you will see a screen like this
To make a new Request you will want to Click the “plus” button you see circled in the image below.
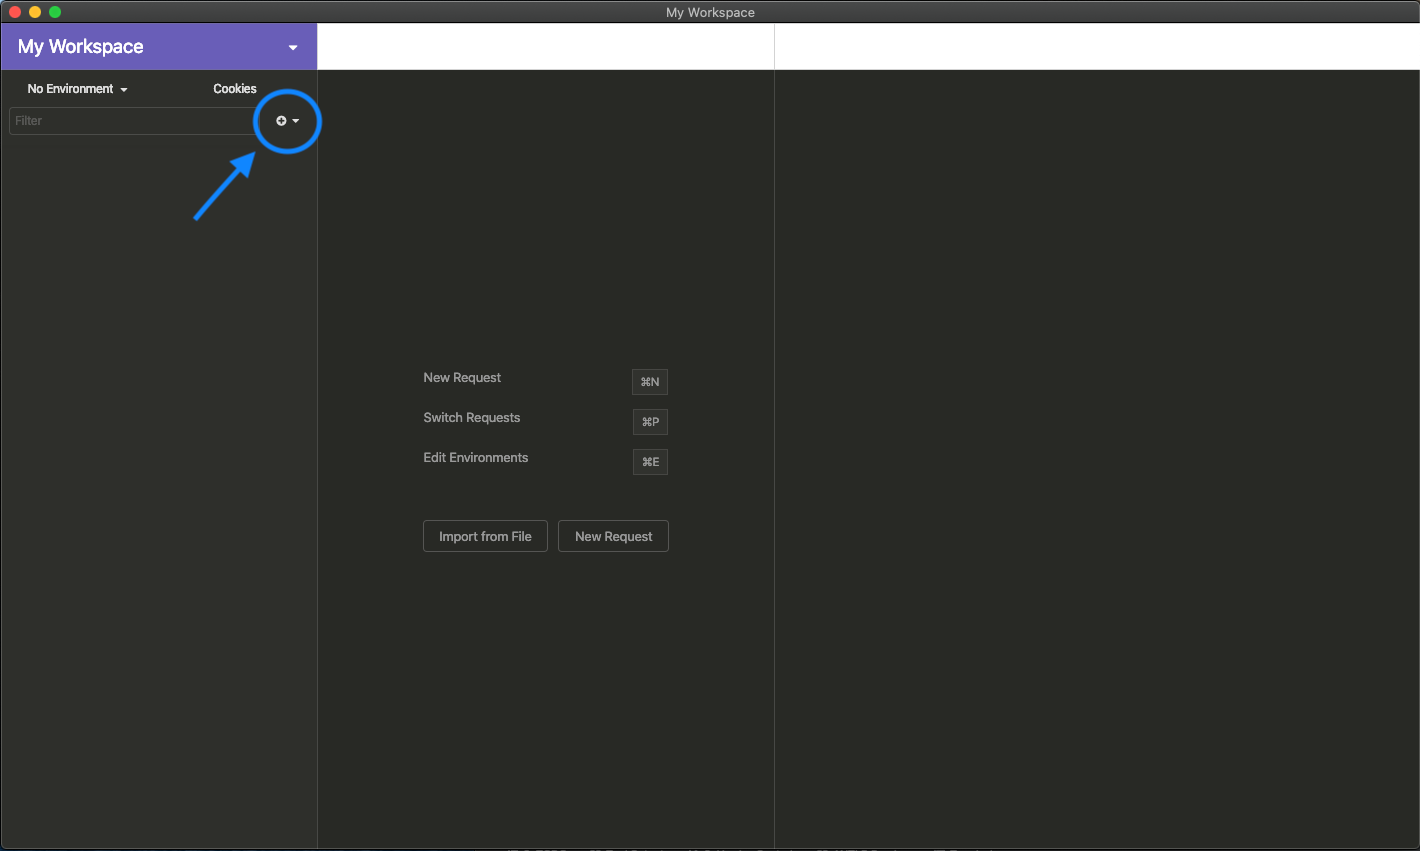
From here you can pick “New Request” or “New Folder”, for this we want to pick “New Request”.
This will cause a popup window where you can name your request and pick the type of request(GET, POST, PUT, PATCH, DELETE, OPTIONS, HEAD) from the dropdown menu.
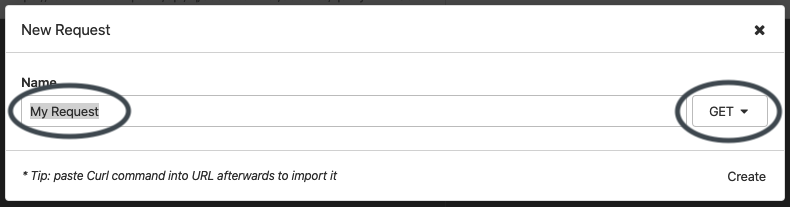
Once you are happy with these options you can hit create. This will make a new item in the panel on the left with the type of request and the name of your request, in this example it is called “My Request”.
You may also notice that the middle panel now has a place to select the type of request and a place to put a url along the top. Below that you will see tabs for “Body”, “Auth”, “Query”, “Header”, and “Doc”. We will make changes in those tabs below when we set up the request.
—
Creating a Dictionary
Setting up the Request Body
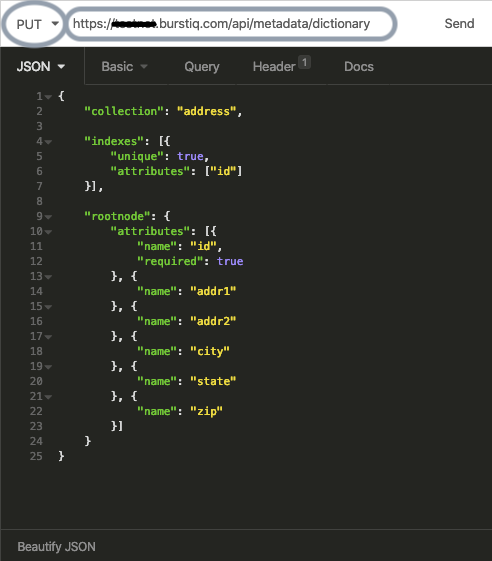
You will need to set up the dictionary and load that using the API. We will define the dictionary in the body of the request. To do that you can click on Body, this will open up a dropdown, you will want to select JSON. This will replace the word “Body” and you can then add in the dictionary information like you see below in the image.
Dictionary in JSON format:
{
    "collection": "address",

    "indexes": [{
        "unique": true,
        "attributes": ["id"]
    }],

    "rootnode": {
        "attributes": [{
            "name": "id",
            "required": true
        }, {
            "name": "addr1"
        }, {
            "name": "addr2"
        }, {
            "name": "city"
        }, {
            "name": "state"
        }, {
            "name": "zip"
        }]
    }
}

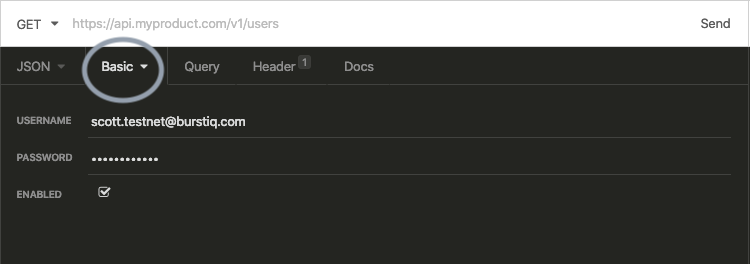
Adding Authentication
The next step is to add the Authentication to the request. You will want to click on the tab that says “Auth” to switch to that panel and then click “Auth” again to open up a dropdown to pick the Authentication type which will be “Basic Auth”.
Now you can enter in your Username and Password as you can see in the image.
Adding the URL
Now we want to Add in the URL and make sure the correct type of request is being made.
The base URL for this request is https://{ASSIGNED_SERVER}.burstiq.com
The API Path you are going to use for creating a dictionary is: /api/metadata/dictionary
The type of call should be PUT
So now Insomnia should look like this below:
Sending the Request
To actually sent the request you can hit “Send” which is located to the right of where you typed in the URL.
If things were successful you will see a response in the panel on the right with a response.
—
Adding an Asset
Once you have the dictionary defined you can then add Assets to the collection that you can eventually query. We are going to insert the Asset below into our newly defined dictionary “address”.
{
    "id": "3456",
    "addr1": "123 Main St",
    "city": "Somewhere",
    "state": "XX",
    "zip": "12345"
}
We can use the previous request in insomnia and we will just need to make a couple modifications to it. First we want to duplicate the request in insomnia to do that move you mouse over “My Request” in the left panel and you’ll see a dropdown icon appear to the right of “My Request”. Click on that and you’ll see a dropdown, we want to pick “Duplicate”.
This will open a new Panel that will allow us to type in a Name for the new request. We can give the new request the name “Add Asset”, then you can click create.
You will now see two requests on the left and the new request “Add Asset” will be highlighted which means we have that request selected.
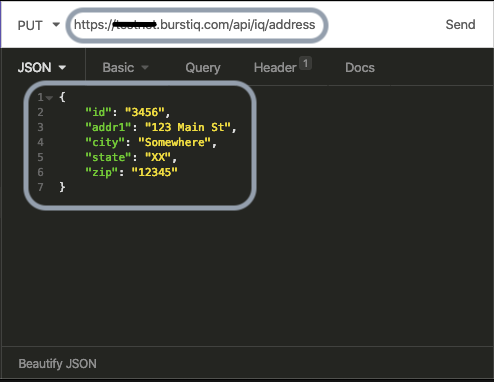
We will want to change the JSON Body of the request to now look like the image below using the JSON Asset above.
The Authentication tab can stay the same because it already has the Username and Password you entered in for the previous request since we Duplicated the request.
Note: If you created a new request instead of duplicating the request we already set up you will need to select Basic Auth and add your username and password to the “Auth” tab
Now we just need to update the URL and make sure we have the correct request type. The new Url will have the same base but the API path will be different.
URL: https://{ASSIGNED_SERVER}.burstiq.com/api/iq/{collection_name}
You will want to substitute {collection_name} with “address” because that is the collection we are adding the asset too.
Insomnia should look like the image below, if you hit “Send” you should see a success response in the response panel on the right.
—
Querying the Asset
Now that we have created our dictionary and added an asset we will want to be able to query that data we added.
We can query for the asset a few different ways, an example request for each way is shown below.
TQL WHERE Clause, TQL, and TQLFlow all use the same API Endpoint path but accept different attributes in the JSON Request Body. Map Reduce uses a different API Endpoint path and a different JSON Request Body.
Note: For Ease of creating a Request using Insomnia you can use the same method shown in “Adding An Asset”, where you just Duplicate a current request. This will bring over all of the current configurations from that request and you will only need to update the JSON Body, the URL path and the Request Type.
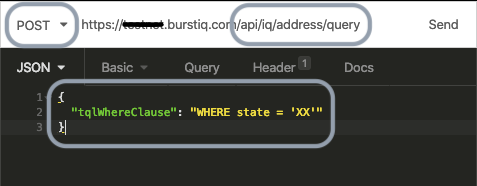
Using TQL WHERE Clause
Your new request should look like this if you are querying using TQL WHERE Clause. See how the URL now ends in /api/iq/{collection_name}/query where {collection_name} is the value address, the Request type is POST, and the JSON body is set as:
{
  "tqlWhereClause": "WHERE state = 'XX'"
}
Note: For further information on how to Structure a where clause see the Query Languages Section on TQL WHERE Clause Query
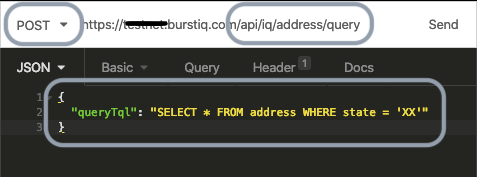
Using TQL
Your new request should look like this if you are querying using TQL query. See how the URL now ends in /api/iq/{collection_name}/query where {collection_name} is the value address, the Request type is POST, and the JSON body is set as:
{
  "queryTql": "SELECT * FROM address WHERE state = 'XX'"
}
Note: For further information on how to Structure a TQL query statement see the Query Languages Section on Basic TQL
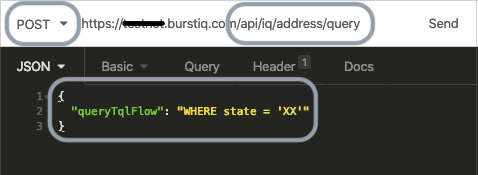
Using TQLFlow
Your new request should look like this if you are querying using TQLFlow. See how the URL now ends in /api/iq/{collection_name}/query where {collection_name} is the value address, the Request type is POST, and the JSON body is set as:
{
  "queryTqlFlow": "WHERE state = 'XX'"
}
Note: For further information on how to Structure TQLFlow see the Query Languages Section on TQLFlow
Result
Notice how regardless of the type of query you use from above it is possible to get the same response for all 3 types of queries in this example because the query statements above are fairly simple and they all support the needed WHERE Clause to get this response:
query response coming soon...
Note: Each of these types of queries have their own use cases and more information can be found in the section Query Languages where each type of query has its own in depth section.
More Information on each:
—
Deleting an Asset
TBD